Monday, November 7, 2011

Cuddly & Warm


I hope you all had a very nice and warm weekend....I know I did!  Our weather was perfect.....we had on and off rain, clouds and blue skies, with temperatures of 65 for the high.  It was time to "finally" pull out my cozy warm sweat pants and sweaters.

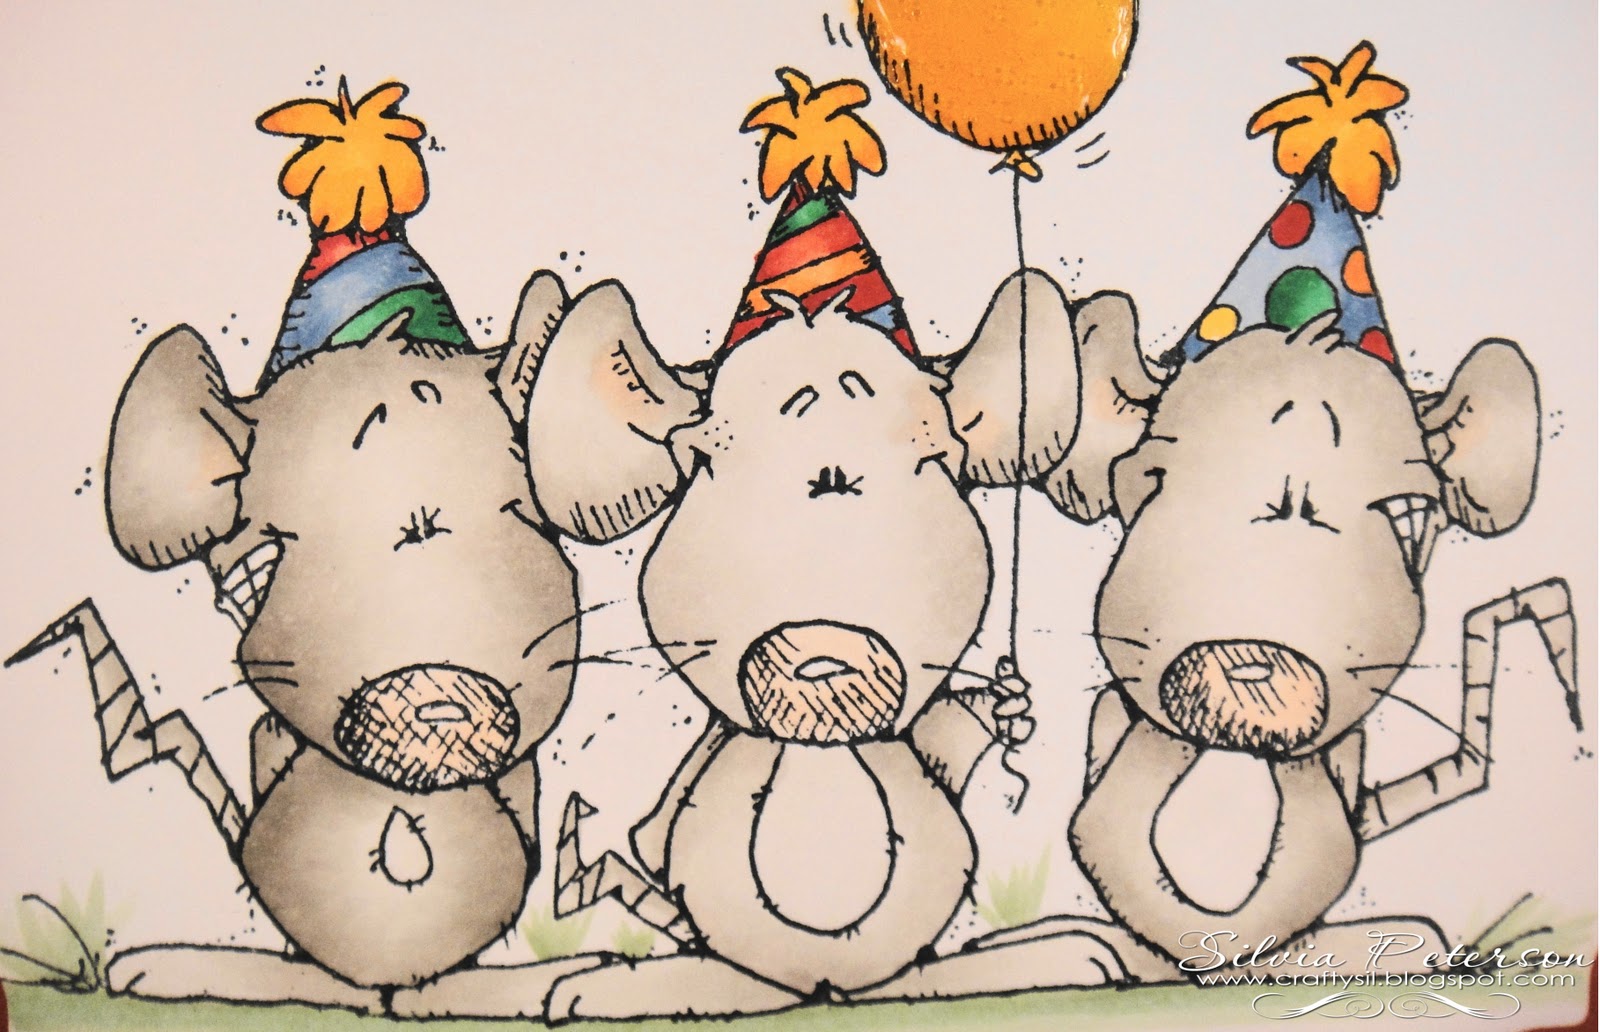
For this card, I used a House-Mouse stamp called "cuddly & warm", stamped it onto Copic X-press it blending card paper using Memento Ink in Tuxedo Black.  I colored the image using Copic markers and finished it off by adding Liquid Applique to each of their Santa hats along with Stampin' Up! Dazzling Diamond glitter.  Using the Spellbinders Nestabilities Standard Circles Large,  I cut out the image and layered onto a piece of Basic Grey paper from the Wassail collection, (which by the way is what I used as my designer paper for this card) that I cut out using the Spellbinder Nestabilities Lacey Circles.  The snowflakes are from the Martha Stewart punch Alpine Snowflake, which I covered with glitter and added a button to each.  The sentiment is from a Hero Arts stamp set called Holiday Sayings.

Thank you for stopping by!


Materials/Supplies used:  Cardstock: Papertrey Ink - Kraft & Ripe Avocado; Designer Paper: Basic Grey Wassail Collection; Stamps: House-Mouse Cuddly & Warm, Hero Arts - Holiday Sayings; Copic Markers; Punches: Martha Stewart Alpine Snowflake; Spellbinders Nestabilities: Large Circles & Lacey Circles; Glitter: Stampin' Up! Dazzling Diamonds; Buttons: Misc stash; Ink: Memento Ink - Tuxedo Black, Tim Holtz Ranger Distress Inks - Vintage Photo, Stampin' Up Stampin spots - Bashful Blue; Liquid Applique in White by Marvy Urchida


Tuesday, November 1, 2011

Warm Hello!


I hope everyone had a very fun & safe Halloween!  It was quite a busy evening for us! 

I'm very excited that it's finally starting to feel like Fall around here.  Our weather will be cooling down dramatically this week, and I think that is what has inspired me to kick off the first of November with these cozy mice!  I think the little mice with the hat and booties is just too cute.  I used this House-Mouse stamp called Warmth for Winter and colored the image using Copics.  The pattern paper is from a 6" x 6" Jillibean Soup mini pad called Dutch Mustard Soup.  The sentiment came from a Hero Arts set called messages.  I love the way this card turned out.  The final card size is 5 1/4" x 5 1/4".

Thank you for stopping by!


Materials/Supplies used -  Cardstock: Papertrey Ink (Dark Chocolate/Ripe Avocado), Stamps: House-Mouse Warmth for Winter & Hero Arts - Messages, Pattern Paper:  Jillibean Soup Dutch Mustard Soup 6 x 6 mini pad, Copic X-press it blending card paper, Copics, Ink:  Memento Ink-Tuxedo Black, Spellbinders Nestabilities:  Classic Scalloped Circles small & Standard Circles Large, Martha Stewart Punch, Ribbon: American Crafts

Friday, October 28, 2011

Coffin Treat Boxes


Every year I create some kind of treat box or make goodie bags for my niece and nephew for Halloween.  Although I don't get to spend it with them, I've always made the effort to send them something.  The sad part is that they are almost getting to that age in which they no longer want to dress up for Halloween, they grow up so quickly.  So this is what I made for each of them along with the test tubes and other goodies.

It's difficult to think of coffins as cute, I know, but let's face it, aren't these cute?  I used a Martha Stewart template found here.   The stamps are from the Hauntingly Delightful set by There She Goes. I know, I know, I couldn't help myself, but this set has so much to offer.  The designer paper is from a stash of Halloween paper that I have had that keeps growing every year, for some reason I keep thinking I need more, I really don't!  I've also used the Martha Stewart deep edger spider web punch, cut it in half, then glued it to the sides of each of the lids.  Each of the images were stamped onto Copic X-press it blending card paper using Memento Ink in Tuxedo Black.  I colored the images using Copic markers, added some shading around the images, cut them using the Spellbinder Nestabilities Circles Large and layered them onto black cardstock that I cut out using the Spellbinder Nestabilities Large Pinking Circles.  I free handed the tags onto which I stamped the sentiments, that are also from the same stamp set.  I purple/black ribbon is from the Celebrate it Halloween collection from Michaels, the orange/black is from The Ribbon Boutique from Hobby Lobby.

With Halloween just around the corner, I think I am all done with Halloween cards.  I'm ready to move onto Winter/Christmas cards.  Even though it's difficult to get into that mode living here in Arizona, where our winter weather is like Spring weather.  Oh well!!

Thank you for stopping by!


Thursday, October 27, 2011

Test Tube Treat Holders


Aren't these cute?  Not an idea of mine of course, I followed the instructions from a tutorial I found here.  I had purchased these Marthat Stewart test tubes from Joanns, but wasn't quite sure what I was going to do with them at the time, it was one of those "better get them, until I think of something" kind of purchases. 

The designer paper I used was from a Cloud 9 photo mat stack that I purchased at Joanns last year called Harvest Holiday.  The stamp set is from one of my favorite Stampin' Up! sets called Booglie Eyes.  I thought I'd bring out my Prismacolor pencils out and give my Copic markers a rest.....I forgot how easy and fun it was to color with Gamsol and colored pencils.  Hope you liked them, I had so much fun creating them!

Thanks so much for stopping by!


Materials/Supplies used:  Stamps:  Stampin' Up! - Booglie Eyes set of 8; Cardstock:  Papertrey Ink - True Black; Designer paper: Cloud 9 - Harvest Holiday; Spellbinder Nestabilities: Small Classic Inverted Scalloped Circles & Large Pinking Circles; Punches: Martha Stewart Scalloped Tag; Ribbon from Misc stash; Prismacolor colored pencils; Gamsol; Ink: Memento Ink-Tuxedo Black & Grape Jelly, Jenni Bowlin-Chicken feed.

Wednesday, October 26, 2011

Trick-or-Treat


I can't seem to get enough of this cute, cute set of stamps by There She Goes called Hauntingly Delightful.  My last two post have been cards that I made using this same set.....and I can't say it will be my last.  I promise, this is my last week of posting Halloween cards, I'm going to start with my Christmas cards really soon.

I'm really not one to create scenes on my cards, so I thought I'd give it a try, and this is what I came up with.  To start off, I stamped three adorable ghosts onto Copic X-press it blending card paper using Memento Ink in Tuxedo Black, colored the pumpkins on each of the images using Copic markers, then covered the ghosts with glitter using Stampin' Up! Dazzling diamonds.  I cut out each image individually as well as the speech bubbles (I also used Copic markers to color in the candy corn and candy, then added glossy accents).  Using one of my "old" tree Sizzix die cuts, I cut out the spooky tree,  to add texture to it, I ran it thru the Big Shot using the Sizzix embossing folder Distressed stripes, then placed it onto my card with dimensionals.  Using the Martha Stewart scary fence edge punch,  I cut out a strip then placed the scary fence in front of the tree, using dimensionals as well.  The pattern paper used was from the 12 x 12 DCWV The Ghost & Ghoblins stack.  The final card size is 5" x 5". 


Materials/supplies used:  Stamps:  Hauntingly Delightful by There She Goes; Cardstock:  Stampin' Up!/Papertrey Ink; Pattern Paper: DCWV The Ghost & Ghoblin stack; Copic markers; Sizzix Die cut - Tree; Cuttlebug embossing folder - distressed stripes; Spellbinders Nestabilities - small circles; Martha Stewart - scary fence edge punch; Glitter: Stampin' Up! - Dazzling Diamonds;  Glossy Accents; Copic Markers; Copic X-press it blending card paper, Memento Ink -Tuxedo Black


Thursday, October 13, 2011

Have a Very Spooky....Halloween!


Today I want to share another Halloween card with you using the same stamp set as in yesterdays post, Hauntingly Delightful by There She Goes stamps.  I used the three different sizes of the mummy's that the set has to offer and tried to space them evenly on my acrylic block.

Using Memento Ink in Tuxedo Black, I stamped them onto Copic X-press it Blending card paper then colored them using Copic markers.  I stamped them again onto Inkadinkado stamping mask paper and cut them out individually so that I can mask each image to add the purple shading around them using a dauber and Memento Ink in Grape Jelly.  I then proceeded to stamp another set of mummys, but only cut out the head out of each of the stamped images so that I may add dimension to the original stamped image (hope all that made some sense....LOL!)

The designer paper used for this card was from the K&Company Kelly Panacci 12 x 12 Halloween paper pad I purchased from Michaels.  I also used the Martha Stewart Spiderweb edge punch to add a border to the top and bottom of my image. The sentiment is from a Hero Arts Clings set called Halloween messages. 

Thanks again for stopping by my blog!  Have a wonderful day!

Materials/Supplies used:  Cardstock:  Stampin Up-Going Grey & Bazzill Basics Paper - Blackbird, Stamps:  Hauntingly Delightful by There She Goes & Halloween Messages by Hero Arts, Punches:  Martha Stewart - Spiderweb punch around the page punch set, Designer Paper: K&Company - Kelly Panacci 12 x 12 Halloween paper stack, Rhinestones: Black rhinestone stickers by Recollections, Inkadinkado Stamping Mask Paper, Ink:  Memento Ink in Tuxedo Black, Copic Sketch Markers

Wednesday, October 12, 2011

Some mummy loves you!


Wow!  It's been a while since I've posted on my blog....I sincerely apologize for being absent so long, it was quite the Summer for me, and I'm just glad it's finally over! 

It's finally that time of the year, my favorite time of the year.....when Halloween is approaching us.  I can't say it's officially Fall here in Arizona, because it still feels like Summer.   We are in the middle of October with temperatures between 95 - 100 degrees.  Although I will admit, the weather is quite nice, compared to what it had been, I'm not complaining.  Now on to the card..... 
 
For the image, I used a stamp from the Hauntingly Delightful set by There She Goes stamps.  I colored it lightly using Copic markers.  The designer paper is from My Minds Eye called Boo to you, it's an old collection.  The sentiment is also from the same set of stamps Hauntingly Delightful.  I stitched around the edge of my first layer of designer paper using the sewing machine.  I also incorporated the Martha Stewart edge punch Drippy Goo to the black layer.  I cut out my image using the Spellbinder Nestabilities Standard Circles Large and layered onto black cardstock that I cut out using Spellbinders Nestabilities Large Classic Inverted Scalloped Circles.

I want to thank all of my followers for continuing to follow my blog, I will make an effort to post more often.  Thank you all for your support!  Blog Candy coming soon!!

Material/Supplies used:  Cardstock  (black)- Papertrey Ink, Designer Paper - My Minds Eye ~ Boo to You!, Stamps - There She Goes, Martha Stewart edge Punch - Drippy Goo, Spellbinders Nestabilities - Standard Large Circles & Large Classic Inverted Scalloped Circles, Memento Ink - Tuxedo Black, Copic Markers (W0, W2, W3, W4), Sewing machine, Buttons

Thursday, April 7, 2011

Happy Birthday Mom!!

Today is my mom's birthday, and I wanted to wish her the very best Birthday, I love you so much Mom!  We don't live near, well we do, but not near enough to swing by and give her a big Birthday hug.  She lives in Southern California, and I live in Arizona, so I had to wait until today to post the Birthday card, in order to make sure that she got it first.


 Gift cards tucked in:


Unfortunately, I have to say I'm guilty of dragging my mother into this hobby of mine.  She started off small, and now half of her bedroom has been claimed by this addiction of paper crafting.  It's really fun to share this hobby with someone close to you whom shares the same passion and excitement for paper and card making tools.  So I knew gift cards to Michaels and Joanns would be the perfect gift, and we all know after long hours of shopping, we can sure work up an appetite, that is where the other gift card will come in handy.

I got the instructions to create this card from Pink Buckaroo Designs, Erica created this very easy tutorial of what she called Gift Pocket wallet.  She has posted on her blog two examples of how you can use this, and I automatically thought the gift card one would come in handy.  The stamped image I used is from The Cats Pajamas, isn't it adorable?   The  inspiration came from their gallery, however, for my balloons, I used a Hero Arts clear stamp set called Wonderful Birthday, stamped each balloon onto a different type of patterned paper and cut the image out.  I colored the image using Copic markers, I then used an atyouspica in clear to add some sparkle to the stars and the gifts (I did this after I took the picture, sorry!)  The pattern paper I used was from the 12 x 12  K & Co Wild Raspberry paper stack. 

For the clouds, I cut them using a Papertrey ink cloud die, I then added Stampin' Up glitter in dazzling diamonds.  The balloons are attached to Cotton candy pink baker's twine.  The textured card stock used for the card base and scalloped envelopes is from Stampin' Up  in Pink Piroutte.  And last but not least, the button brads are from Making Memories.

I also wanted to comment that the reason I haven't been blogging much is because I've been keeping myself busy making invitations for a Sweet Sixteen birthday party.  A friend of my Mom's asked if I could make 60 invitations for her daughters birthday party and I quickly jumped at the opportunity.  Although, I had no idea what I had gotten myself into, until shortly after I started cutting into the paper and seizing everything up.  Here's a little glimpse of what  my assembly line looked like during the process.  I'm about 90% done, and I couldn't be happier!


Thank you so much for stopping by!

Wednesday, March 16, 2011

Bunny Hugs


Hi Everyone!  For today's card, I have created an Easel card that measures 5 1/4" x 5 1/2".  I used an adorable stamp from Inky Antics called Carrot Bunny clear Set.  I purchased this from my local scrapbooking store Crop Girls, they have a great selection of stamps. 

I stamped my image onto Copic X-press it blending card using Memento Ink in Tuxedo black, I then colored the image with Copic markers (which because of the lighting you can't really appreciate the bunny's greyish shading and pink tones on it's nose and ears).  I stitched all my layers using my sewing machine.  The pattern paper is from Cosmo Cricket Garden Variety.  For the cardbase I used Papertrey Ink - Kraft cardstock, and for the layers under the pattern paper, I used Stampin' Up Old Olive. 

I sprayed Tattered Angels - Tiger Lilly onto some white Prima flowers and added a button from my stash.   For the outside and inside sentiment, I used stamps from the same collection, the inside sentiment I cut out using the Spellbinder Nestabilies Curved Rectangles, in the smallest size. 

Thanks for stopping by!


Thank YOU so much Leslie!!

I received a package today full of great goodies from Leslie, you can visit her blog at http://www.scrapsofmine.blogspot.com/. I have to say I am totally speechless by the gesture and her thoughtfulness. Leslie, I am so touched by the beautiful card you have sent me, it put me to "happy" tears, as the first thought that came to mind was my baby girl. This has to be the cutest image I've seen....I absolutely LOVE IT!! I love your card Leslie!!! Not to mention the beautiful frame you have created, it's stunning and I have the perfect photo of my husband and I that will look great in it. The set of stamps is from Elsie, it's adorable! I have not seen it before and I just love that fire hydrant, the cute little bone and the tiny paw prints.....LOVE it!! This will come in really handy on a mini I'm working on (have been working on for the past 8 months...shameful, I know!) Leslie also sent me quite a few images that I know I will enjoy coloring. Thank you so much for the lovely papers, the buttons, the beautiful lace and trim....but most of all for that beautiful card that I will treasure. You are a sweetheart Leslie!


Thursday, March 10, 2011

Birthday Rats by Whipper Snapper Designs


INSIDE OF CARD:


I know I say this about all my stamps, but I really love them all or else I wouldn't buy them, but this stamps is just soooo cute!  It's my first Whipper Snapper stamp and definitely not my last. 

I started by stamping my image onto Copic X-press it blending card paper using Memento Ink in Tuxedo Black, I then colored my image using Copic markers.  Using my Spellbinder Nestabilities Curved Rectangles, I cut out the image as well as the bottom layer in Pure Poppy cardstock from Papertrey Ink.  The pattern paper I used was from an old Basic Grey Collection called Cupcake.  The sentiment used was from a Hero Arts clear stamp set called Big Hugs.  I added glossy accents to the balloon, which by the way, I think I added too much, but that's okay, it still looks good.  I'm definitely going to be using this stamp again with different card layouts, so expect to see it again!

Thanks for stopping by and I hope you're having a great day! 

Materials/Supplies used:  Card base: Papertrey ink - White, layers Pure Poppy; Stamp: Whipper Snapper Designs - Birthday Rats; X-press it blending card; Copic Sketch markers; Spellbinder Nestabilities - Curved Rectangles; Buttons - from my stash; Rick Rack Ribbon - Joann craft Essentials; Glossy Accents by Ranger; Stamped Sentiment - Hero Arts Clear stamp ~ Big Hugs; Pop-Dots - Ek Success; Pattern Paper - Basic Grey~Cupcake; Punch - Martha Stewart edge punch


Wednesday, March 9, 2011

Hedgehog Bouquet by Penny Black


It's sure starting to feel like Spring here in Arizona, the weather has been really nice.  Although I strongly believe that we really only have two seasons here, it's either Spring or Summer.  Either way, I love it here!

In todays card I am using a Penny Black stamp called "Hedgehog Bouquet".  It makes me think of Spring!  I've been really into Penny Black stamps, so you will be noticing a lot of cards with several different Penny Black images to come, hope you like them.  The pattern paper is from My Minds Eye called Home, I purchased this 6" x 6" stack at Michaels last year and I'm just now getting around to using it, can you believe that?   I used the Spellbinder Nestabilities Standard circles large to cut my image out, then for my layer, I used the Nestabilities Big Scalloped Circles large....I love the way it turned out.
I've actually been creating most of my cards without sentiments, I feel I often need a card and I've already added a sentiment and can't use it, so, I have decided that on the cards that can be used for more than one occasion I am leaving without sentiment until I have a use for it.

Thanks for stopping by....Have a great day!

Materinals/Supplies used:  Cardbase: Papertrey Ink - White cardstock & Melon Berry; Pattern paper: My Minds Eye - Home; Pearls - Recollections; Stamp - Penny Black - Hedgehog Bouquet; Spellbinders Nestabilities - Big Scalloped Circles LG, Standard Circles Large; Copic Sketch Markers

Thursday, March 3, 2011

Cheeky Boy by Stampavie


For todays card, I am using an adorable stamp from Stampavie called Cheeky Boy from the Penny Johnson Collection.  Isn't he too cute?  I think so!  I stamped my image onto Copic X-press it blending card paper using Memento Ink in Tuxedo Black, I then colored it with Copic markers.  The pattern paper I used was from the DCWV "The Guy Stack", that I also used on my previous post. I stitched around the layers of my card using my Singer sewing machine.

I used the small deckled rectangles Spellbinders Nestabilities to cut out the stamped image, using a sponge dauber, I sponged around the image with Bashful Blue from Stampin' Up Classic Ink.  I threaded each of the buttons, which then using Glossy accents, adhered them to the card.


Materials/Supplies used:  Cardstock - Kraft & Dark Chocolate from Papertrey Ink, Pattern Paper - DCWV "The Guy Stack", Stamp - Stampavie "Cheeky Boy" Penny Johnson collection, Buttons - from my stash, Stamped sentiment - Hero Arts Sparkle Clear - Live it up, Copic Markers, 3D dimensionals by Ek Success, Glossy Accents by Ranger, Stampin' Up! Classic Ink - Bashful Blue, Sponge Dauber by Tsukineko, Spellbinder Nestabilities - Small Deckled Rectangles

Monday, February 28, 2011

Mr. Fix- it


Add caption

I hope everyone had a great weekend!  I wanted to start off by thanking those of you who left me such thoughtful comments on my last blog posting, it really meant a lot to me and it helped me get thru that tough time....

Now on to my card....I've been wanting to start creating more masculine cards, whether it be for Birthday or Father's Day or just because, it seems like we don't see much of them.  Being it that it is going to be for a male, it has to be more simple, I can't imagine putting ribbon, bows or flowers on them, so for me, that makes it much more quicker to make.

For my image, I used a stamp from Stampavie called Mr. Fix-it.  I knew right away what paper stack I wanted to use with it, I've been hoarding this stack since it first came out last year, it's from DCWV called "The Guy Stack", available at Joann Fabric and craft store.  Using Memento Ink in Tuxedo black, I stamped my image onto Copic X-press it blending card paper, then colored the image with Copic markers.
I seldom use brads on my cards, so this was something I knew would have to come into play in place of flowers and ribbon.  I also used an EK Success Dotted wave edge punch, for both of the strips across the card.

I didn't add a sentiment to it yet, as it could either be used for both Birthday or Father's Day....so, I'll just wait until I have to use it to decide.  Hope you liked it!


Materials/Supplies used:  Cardstock: Papertrey Ink - White & Enchanted Evening, Patterned Paper: DCWV The Guy Stack, Edge Punch: Ek Success Dotted Wave, Brads: unknown, Copic Sketch Markers, Stamp: Stampavie - Mr. Fix-it Laurence Collection, Tim Holtz Distress Ink - Antique Linen, Dimensionals: 3D Dots 1/8" thick by Ek Success, Zapdots 1/2" thick in black by Helmar

Thursday, February 17, 2011

In Loving Memory of my Baby Girl


It is so difficult for me to write this post, but I wanted to dedicate it to my beautiful baby.  She became ill last Thursday, it seemed as though it was nothing more than a bacterial infection, we took her to the Vet on Monday, he ran so many tests, sent us home with medication, but she just couldn't hang on anymore, she passed away early Tuesday morning.  Apparently, she had cancer, and there would of been nothing we could have done for her.....I am crushed, I can't seem to find any comfort in anything I hear....and most of all there is this horrible void that I can't stand.  We have no kids, so our dogs are like our kids....we rescued her in July 2001 and since then, she brought us so much joy, she enjoyed sun bathing, loved her blankies and always followed me everywhere....

I know I said I would get better with my blog postings, but I hope you can all understand, I won't be posting for a while.....I'll be back, I just need some time to heal.
Thank you all for your understanding! 
Related Posts Plugin for WordPress, Blogger...